|
|
by Michael A. Morrow |
|
|
Here I show
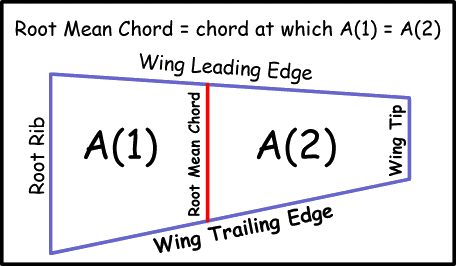
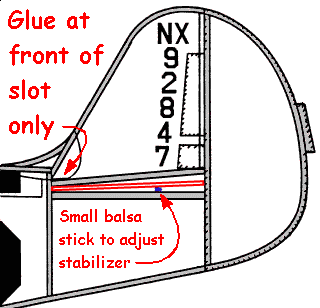
the step-by-step process by which I flight-test all my No-Cals. I have tried to keep the process as simple as possible, so as to produce the most reliable results. There are other methods, processes, and procedures used for flight-trimming No-Cals, or indeed any type flying model, that might produce a more finely tuned flying model, but this method should get you in the ball-park, and will put you ahead of those that do not use a consistent process for trimming. Soooo, on with the flight-trimming! COPYRIGHT 6/1/96 by Michael A. Morrow I try to keep flight trimming as simple as possible. I do it in three distinct steps, in this order. 1) balance the model at 25% wing chord, and never touch the balance point again, 2) adjust the stabilizer for a nice flat glide, and never touch the stabilizer again, 3) make all powered flight adjustments with the thrust line. I have followed this procedure with every model, and it works every time, if followed religiously, and there are no unintended warps in the structure. It is even the procedure I used to trim my Vought XF5U-1 Flying Pancake. There are slight differences depending on the model being adjusted, but they have to do with the model design, not the procedure. I'll cover three different types of models as an illustration of the trimming process. 1) The first, and simplest type of model to trim is a model with balanced rubber: that means equal lengths of rubber in front of and behind the center of gravity. I have tried to design most of my models this way. 2) This section to be added at a later dateThe second type is a model with unbalanced rubber - that means more rubber behind the balance point than in front of the balance point (or vice-versa for a pusher). This is a common characteristic of models with very short noses, and includes long-tail models like my Cessna CR-3, Flying Flea, He-112, and Piper Skycycle designs. 3) This section to be added at a later dateThe third type of model I'll cover is a model that won't glide with the props in place because the props are too big and produce too much drag; specifically, my Vought XF5U-1 Flying Pancake. So let's start with the simplest type of model - a model with balanced rubber, i.e., a model with equal amounts of rubber both in front of and behind the center of gravity of the model. Since the rubber is balanced on this type model, adding rubber will not change the balance point, so you can balance the model without the rubber installed. Step 1: Balance the model at 25% of the wing root chord measured from the leading edge. "Yeah, right!", I hear you say. "How do I find the 25% chord?" Well, For a model with a constant chord wing, finding the 25%*** center of gravity is easy. Measure the wing chord at the wing root, divide by 4, and measure that far back from the leading edge. Voila! A 25% chord balance point. Use a ruler and measure it! Don't guess at it! For a model that doesn't have a constant chord wing, it gets a little more complicated. Models with swept-back leading edges or swept-forward trailing edges require the CG to be measured on the Root Mean Chord of the wing, and then transfered straight across to the wing root rib. To do this, you'll need to find the Root Mean Chord. The Root Mean Chord is the chord on the wing where: In the graphic below, that means A(1) = A(2).  I know two methods to find the Root Mean Chord. Method 1) Use the quadratic equation to find the Root Mean Chord (not for the math-challenged) Method 2) Use graphical anaylsis to find the root mean chord (the easier method) Once you've found the Root Mean Chord, calculated the Center of Gravity (CG), and located it on the model, you are ready to balance the model. At a later date I will show how to calculate the Root Mean Chord for wings with more complex shapes, like elliptical wings, or wings with multiple sections that are not alike. Most No-Cal models don't have a place to put pins in the wings to balance them, so I make a hole in the tissue on top of the fuselage at the balance point and hold the model up with a pin through the hole to check the balance. To balance a model, I do the following:I recommend NOT using a heavy prop to balance a short-nosed model, because . . . Flying Model Truth Number 1: The lighter the prop, the easier it is to flight trim the model. This is because The Rubber doesn't Care Whether it Turns The Prop or the Model. It will do whatever is easiest. If the prop is heavy compared to the model, it will turn (roll) the model, and you will have to use the flying surfaces to trim the model. All well and good as long as the rubber is turning the prop, but once the rubber runs down, those flying surface adjustments you made to compensate for the heavy prop take over, and the model spirals into the ground. If the prop is light compared to the model, you won't have to use the flying surfaces to correct for prop torque, and when the rubber runs down, the model will continue to fly just as it did when the rubber was turning the prop. Once you've got the model balanced so it hangs perfectly horizontal, it's on to Step 2. Step 2: Adjust the stabilizer for a nice flat glide, and never touch the stabilizer again.  To trim a model properly, the stabilizer needs to be adjustable. I use a triangular slot for the stabilizer on all my models. The slot is the thickness of the stabilizer at the front. The bottom of the slot is flat, and the top of the slot angles up at about five degrees. With the fuselage blocked up vertically, and the stabilizer blocked up horizontally, I very carefully glue the leading edge of the stabilizer in the slot, and leave the rear of the stabilizer free for adjustment. I adjust the stabilizer angle by sliding a small stick of balsa forward and back between the horizontal slot member and the stabilizer itself.
To properly test glide the model, make sure you . . . a) Test glide WITH the propeller installed,Step 3 Make all powered flight adjustments with the thrust line. a) I set up all my indoor No-Cal models to fly left under power, so I start by adding a couple degrees of downthrust, and 2 to 3 degrees of left thrust. |
|
Michael A. Morrow's AERO ACES - Doing Business since 1995 ! AERO ACES is a TRADEMARK of Michael A. Morrow. © All Images, drawings, plans, articles, and kits, are Registered & Copyrighted by Michael A. Morrow |