| Back to the Plastic Model Suppliers page |

|
 1/48 AMTech Focke-Wulf TA-183 "Huckebein"
by Michael Morrow I had been hearing stories and reading reviews about how good the AMTech TA-183 kit was for a couple of weeks. TA-183 builds in the most creative and colorful color schemes imaginable were being posted on the internet and brought to the local model meetings, where the kit was praised even more. Curious to sample the state of the art, I finally broke down and got one from Emil up at Skyway Models.  The reviews were all they said it was - the AMTech TA-183 was a great kit, but I decided to try to make it better by trying out a few techniques I hadn't used before, one of which was using photo-etch cockpit parts. When I got the kit, I also picked up an Edward FW-190 D-9 photo-etch cockpit set. This would be the first kit I built where I added after-market details.
So here's my build. Starting with the cockpit, I added photo-etch seatbelts, handles, levers, and rudder pedals from the Eduard FW-190 D-9 photo-etch set. Since you can see the back of the instrument panel, I also added wiring to the back of the instruments. Getting the cockpit tub to fit properly resulted in the EZ-42 gun-site being lowered so only half of it looked over the cockpit dash. The site was cut off, and small holes carefully drilled for new, taller posts made from stretched sprue. The gunsite was glued on AFTER the model was completely painted to prevent damage during the extensive masking for painting. 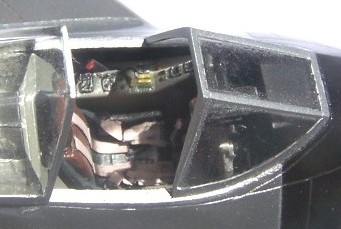 The canopy comes as a single piece, so I cut the windscreen away from the canopy so the sliding portion of the canopy could be displayed in the open position to show off all the cockpit detail. The canopy wouldn't sit on the aft deck without support, so a piece of armour plate was shaped and glued in place inside the canopy just aft of the clear section. The armour supports the canopy on the aft deck, and allows the canopy to be displayed properly in the open position. The Eduard set also includes a canopy pull-back handle which was installed just inside the sliding canopy's front frame.
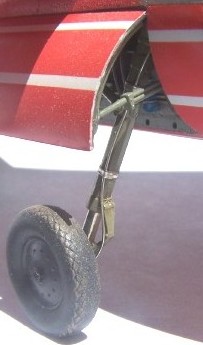
 The landing gear were enhanced with chrome-style BARE-METAL adhesive foil wrapped around each strut oleo, very effectively simulating highly polished oleo struts. Aluminum wire was added to each main gear leg to simulate brake lines. The front landing gear leg was heated and turned to represent a front wheel being steered to the left.
 |
 Scale 30mm cannon barrels were added to the nose from sections of stainless hypodermic tubing.
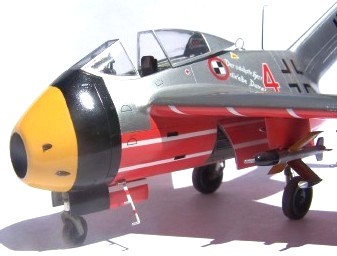
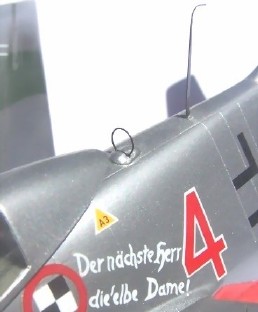
A wing-mounted pitot tube made from scale-size telescoping stainless hypodermic tubing was also added. Red and green clear plastic wingtip navigation lights were added. The solid plastic lights were cut away, and pieces of clear red and green plastic were glued in their place. When dry, they were sanded to shape and polished to a shine. A DF loop base fairing was carved and added to the top of the fuselage just behind the rear of the open canopy. A mounting hole was drilled for the morane antennae halfway between the DF loop mount and the tail. After painting was completed, the DF loop and morane antennae from the Eduard FW-190 D-9 photo-etch set were added to the fairing and mounting hole respectively.  Since the TA-183 never saw service, nearly any color scheme can be used. Some of the most famous color schemes applied to FW 190's were those of the famous JV-44 "Papagei Staffel" which flew FW 190 D-9's for Me-262 landing protection flights. The bottom of their FW 190 D's were painted all red with narrow longitudinal white stripes, making these aircraft the most colorful of all FW 190 D's in service! In addition, the spinners were painted yellow and black, and each of the four aircraft in the flight was adorned with a memorable slogan on the left side of the aircraft.
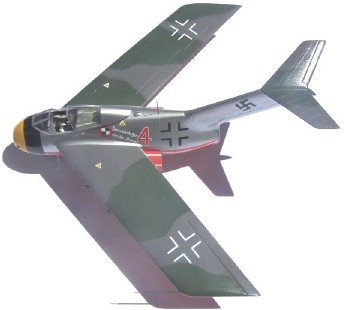 I chose the markings of "Red 4", originally on a rare FW 190 D-11 as the markings for my TA-183, under the presumption that if the war had continued, JV-44 might have traded their FW 190 D's for TA-183's. The decals came from an old 1/48 scale "Experten Decals" set I had which included decals for "Red 4". I painted the fuselage and vertical tail bare metal with the top of the wings and stabilizer in standard RLM 83 Dunkel-grun and RLM 75 Grau-violet camoflage. The entire bottom of the aircraft was painted RLM 23 red with narrow white longitudinal stripes. An RLM 04 yellow and black striped nose finished off the color scheme. Finally, the tires were dry-brushed with flat light tan to simulate dried mud, a very effective and realistic touch.
All the effort was worth it, as I managed to pull down a very pleasing second place in class for my efforts!
|